wibiya widget

Enable virtual Wi-Fi


Windows 7 includes a little-known new feature called Virtual Wi-Fi, which effectively turns your PC or laptop into a software-based router. Any other Wi-Fi-enabled devices within range - a desktop, laptop, an iPod perhaps - will "see" you as a new network and, once logged on, immediately be able to share your internet connection.

This will only work if your wireless adapter driver supports it, though, and not all do. Check with your adapter manufacturer and make sure you've installed the very latest drivers to give you the best chance.

Once you have driver support then the easiest approach is to get a network tool that can set up virtual Wi-Fi for you. Virtual router (below) is free, easy to use and should have you sharing your internet connection very quickly.

Virtual router

If you don't mind working with the command line, though, maybe setting up some batch files or scripts, then it's not that difficult to set this up manually.

How change parts of a theme


  1. Open Personalization by clicking the Start button Picture of the Start button, and then clicking Control Panel. In the search box, type personalization, and then click Personalization.

  2. Click the theme that you want to change to apply it to your desktop.

  3. Do one or more of the following:

    • To change the background, click Desktop Background, select the check box for the image that you want to use, and then click Save changes.

    • To change the color of window borders, click Window Color, click the color that you want to use, adjust the intensity, and then click Save changes.

    • To change the sounds for the theme, click Sounds, click an item in the Sound Schemes list, and then click OK.

    • To add or change a screen saver, click Screen Saver, click an item in the Screen saver list, change any settings that you want to change, and then click OK.

    Your revised theme will appear under My Themes as an unsaved theme. If you want to come back to your unsaved theme later, make sure you save it.


Unlock all the hidden features in Windows 7.

Instead of going through all the currently-available tweaks manually, this tool will patch up all the files itself and enable the features that were demoed at PDC 2008.

Following files will be patched:

* WindowsExplorer.exe
* WindowsSystem32wisptis.exe
* WindowsSystem32ieframe.dll
* WindowsSystem32shell32.dll
* WindowsSystem32stobject.dll
* WindowsSystem32TabletPC.cpl
* WindowsSystem32themecpl.dll
* WindowsSystem32themeui.dll
* WindowsSystem32powercfg.cpl

And remember to backup
the above-mentioned files first, as this patch will not create a backup of them.

Download this software

How to Uninstall Internet Explorer for Good

This is for those users who have proplem in slow working for windows 7. Just follow the steps below to uninstall IE

Step 1: Click on the Start Menu and move to the Control Panel
Step 2: Select the Programs and Features
Step 3: Click on Turn Windows features on or off link located on the left pane
Step 4: The Turn Windows features on or off window appears. Uncheck the Internet Explorer 8 and click OK
Step 5: After a couple of restarts Internet Explorer should be gone for go

How to Avoid 200MB Hidden System Partition From Been Created During Windows 7 Installation

Unknowingly to many Windows 7 users, a hidden primary system partition which is active will be automatically and forcefully created by setup during installation of Windows 7. The additional separate standalone NTFS partition, which is not labeled with any drive letter or path, has the size of 200 MB, but only occupy 32 MB of it with 168 MB remains free.

The small 200MB partition actually holds Windows Recovery Environment (WinRE), which only available from DVD installation disc in previous operating system such as Windows Vista . The partition holds system files and bootable files that are essential to boot the Windows 7 properly in the event of the need to recover the OS in the event of corruption. The 200MB partition is pretty much similar to many recovery partition that been made on factory installation by most OEMs on the computer they sold.

However, when the small 200 MB separate partition has been created by Windows 7, it’s almost impossible to be deleted or removed. User cannot use delete the volume using Storage Disk Management in Computer Management. If forcefully deleted with third party partition manager or partition editor, Partition Table which is (normally) located in the master boot record (MBR) may be corrupted, or may become invalid.

The cause for the Partition Table error is because the 200MB partition does not use the standard sector zoning format. When deleted with partition tool which does not support non-standard partition type, the Partition Table will be corrupted. When the Partition Table is corrupted, the third party partition editor will show disk partition error has occurred on any re-created partition that uses the freed space (Disk Management in Win 7 do not show the error though). And the hard disk tends to have unallocated disk pace of 1 to 2 MB in size randomly. Format the hard disk volume or partition cannot fix the error either. In worst case scenario, some partition may be lost occasionally, causing files or data lost.

For Windows 7 users who don’t want the 200MB partition to be created and existed, the best way is to stop Windows 7 installation process to create the partition when installing Windows 7. In Windows 7, the feature (200 MB partition to store WinRE files) is installed on all computers if the OS is installed on hard disk with single partition scheme, or unallocated space (space which not yet been partitioned) on the hard disk drive.

Thus in order to skip or avoid the 200M partition to be automatically created during installation, here’s a few rules to follow when choosing where to install Windows 7 to:

  1. Do not install Windows 7 to a hard disk that not yet been partitioned or to unallocated space (When install Windows 7 to unallocated space, no warning pop-up or confirmation is asked, and setup will straight away and directly create partition 200 MB of disk space as special partition without notification).
  2. If possible, try to create all the necessary partition(s) and format the partition(s) before attempting to install Windows 7.
  3. If you’re installing Windows 7 into a new hard disk, or a blank hard disk with no partition defined yet, or if you must delete all existing partitions to start afresh, chose Drive options (advanced). Delete (if applicable) unwanted partitions. Then, click New to create the single partition or multiple partitions according to your own preference.

    Windows 7 Additional Partition During Installation

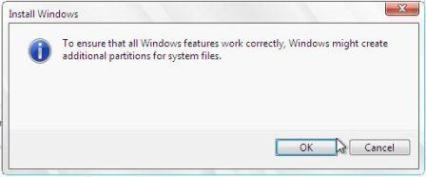
    When prompted with dialog box saying “To ensure that all Windows features work correctly, Windows might create additional partitions for system files”, click on Cancel button. Optionally, to be double confirm, Format the partition before selecting it to install Windows 7.

When Windows 7 does not create the special 200MB partition, the WinRE recovery environment is stored in a folder in the root of Win7 installation drive. For example, if Windows7 is installed to a partition with a label of C:, the WinRE will be located located at C:Recovery.


Tweaking the Clock


Here is one tip for getting a little extra functionality from the Vista clock on the taskbar.
As simple as that clock is, many users need to keep track of time in multiple time zones.
Fortunately, you can do that right within your taskbar.
Right-click your clock on the taskbar and
select Adjust Date/Time. Select the Additional


Clocks tab and then determine whether you
need one or two additional clocks; then
select which names and time zones you
require.
The next time you hover your mouse over
your time, you will see the other time zones
you have configured. This is a great tool for
travelers who like to call home or business
employees who have offices and clients in
other zones.
You could also set up gadgets in the
Windows Sidebar to show you multiple
times in different zones. You are welcome to
choose whichever method you like best.

How to Enable the Windows Aero in Windows 7

If you were looking for the best designed and most transparent Microsoft user interface then you can't escape Windpws Aero. Here's a hack to enable Windows Aero in Windows 7. But before you proceed with the steps keep a backup of your registry.

Step 1. Click on the Start Menu and type “regedit” into the search box. When the program appears click to open the regedit.exe icon.
Step 2. Locate the Key below
HKEY_CURRENT_USERSoftwareMicrosoftWindowsDWM

Step 3. Look to the pane on the right of the key hierarchy. Right click on the white area and select New > DWORD (32 bit) Value.
Step 4. As the value appears name it UseMachineCheck.
Step 5. Repeat and create 2 more DWORD Values, Blur and Animations
Step 6. First double-click the value just created with the UseMachineCheck and enter 0 in the Value Data box. Do the same for Values Blur and Animations. Then click OK.
Step 7. Now close the Registry Editor.
Step 8. Open the Start Menu and type “cmd” into the search box, right-click on cmd.exe when the program appears in the search results. Now, select Run as Administrator from the drop-down.
Step 9. As the Command Prompt opens type the commands below

i) Net Stop uxsms – this command will stop the Desktop Windows Manager Session Manager

ii) Net Start uxsms– this command will restart it

Step 10. Once you close the Command Prompt. Right click on the desktop and click on Personalize from the menu.
Step 11. Click on the Window Color and Appearance in the Personalization Windows Aero the Color Scheme menu.

And it's done

12 tricks for WIn 7

Restore your gadgets

Windows 7 has tightened up its security by refusing to run gadgets if UAC has been turned off, so limiting the damage malicious unsigned gadgets can do to your system. If you've disabled UAC, miss your gadgets and are happy to accept the security risk, though, there's an easy Registry way to get everything back to normal. Run REGEDIT, go to HKEY_LOCAL_MACHINE\SOFTWARE\Microsoft\Windows\Curr entVersion\Sidebar\Settings, create a new DWORD value called AllowElevatedProcess and set it to 1. Your gadgets should start working again right away.


New WordPad formats

By default WordPad will save documents in Rich Text Format, just as before. But browse the Save As Format list and you'll see you can also save (or open, actually) files in the Office 2007 .docx or OpenDocument .odt formats.


Protect your data

USB flash drives are convenient, portable, and very easy to lose. Which is a problem, especially if they're carrying sensitive data. Fortunately Windows 7 has the solution: encrypt your documents with an extension of Microsoft's BitLocker technology, and only someone with the password will be able to access it. Right-click your USB flash drive, select Turn on BitLocker and follow the instructions to protect your private files.


Minimise quickly with shake

If you have multiple windows open on your desktop and things are getting too cluttered, it used to be a time-consuming process to close them all down. In Windows 7 you can use the Aero Shake feature to minimise everything in seconds, using a cool mouse gesture. Grab the title bar of the window you wish to keep open and give it a shake, and rejoice in a clear desktop area.


Configure your favourite music

The Windows 7 Media Centre now comes with an option to play your favourite music, which by default creates a changing list of songs based on your ratings, how often you play them, and when they were added (it's assumed you'll prefer songs you've added in the last 30 days). If this doesn't work then you can tweak how Media Centre decides what a "favourite" tune is- click Tasks > Settings > Music > Favourite Music and configure the program to suit your needs.


Customise System Restore


There was very little you could do to configure System Restore in Vista, but Windows 7 improves the situation with a couple of useful setup options.
Click the Start orb, right-click Computer and select Properties > System Protection > Configure, and set the Max Usage value to a size that suits your needs (larger to hold more restore points, smaller to save disk space).
And if you don't need System Restore to save Windows settings then choose the "Only restore previous versions of files" option. Windows 7 won't back up your Registry, which means you'll squeeze more restore points and file backups into the available disk space. System Restore is much less likely to get an unbootable PC working again, though, so use this trick at your own risk.


Run As

Hold down Shift, right-click any program shortcut, and you'll see an option to run the program as a different user, handy if you're logged in to the kids' limited account and need to run something with higher privileges. This isn't really a new feature - Windows XP had a Run As option that did the same thing - but Microsoft stripped it out of Vista, so it's good to see it's had a change of heart.


Search privacy

By default Windows 7 will remember your PC search queries, and display the most recent examples when searching in Windows Explorer. If you're sharing a PC and don't want everyone to see your searches, then launch GPEDIT.MSC, go to User Configuration > Administrative Templates > Windows Components > Windows Explorer, double-click "Turn off display of recent search entries..." and click Enabled > OK.


Tweak PC volume

By default Windows 7 will now automatically reduce the volume of your PC's sounds whenever it detects you're making or receiving PC-based phone calls. If this proves annoying (or maybe you'd like it to turn off other sounds altogether) then you can easily change the settings accordingly. Just right-click the speaker icon in your taskbar, select Sounds > Communications, and tell Windows what you'd like it to do.


Rearrange the system tray

With Windows 7 we finally see system tray icons behave in a similar way to everything else on the taskbar. So if you want to rearrange them, then go right ahead, just drag and drop them into the order you like. You can even move important icons outside of the tray, drop them onto the desktop, then put them back when you no longer need to keep an eye on them.


Extend your battery life

Windows 7 includes new power options that will help to improve your notebook's battery life. To see them, click Start, type Power Options and click the Power Options link, then click Change Plan Settings for your current plan and select Change Advanced Settings. Expand Multimedia Settings, for instance, and you'll see a new "playing video" setting that can be set to optimise power savings rather than performance. Browse through the other settings and ensure they're set up to suit your needs.


Write crash dump files

Windows 7 won't create memory.dmp crash files if you've less than 25GB of free hard drive space, annoying if you've installed the Windows debugging tools and want to diagnose your crashes. You can turn this feature off, though: browse to HKEY_LOCAL_MACHINE\SYSTEM\CurrentControlSet\Contro l\CrashControl, create a new DWORD value called AlwaysKeepMemoryDump, set it to 1, and the crash dump file will now always be saved.

Clean up Live Essentials

Installing Windows Live Essentials will get you the new versions of Mail, Movie Maker, Photo Gallery and others - great. Unfortunately it also includes other components that may be unnecessary, but if you like to keep a clean system then these can be quickly removed.

If you left the default "Set your search provider" option selected during installation, for instance, Windows Live will install Choice Guard, a tool to set your browser home page and search engine, and prevent other programs from changing them. If this causes problems later, or you just decide you don't need it, then Choice Guard may be removed by clicking Start, typing msiexec /x and pressing [Enter].

Windows Live Essentials also adds an ActiveX Control to help upload your files to Windows Live SkyDrive, as well as the Windows Live Sign-in Assistant, which makes it easier to manage and switch between multiple Windows Live accounts. If you're sure you'll never need either then remove them with the Control Panel "Uninstall a Program" applet.

Unlock Taskbar in Windows 7


Download the 32-bit or 64-bit tools as per your requirement and place it into the Windows directory

Open command prompt with administrative privileges and type the following commands

  • takeown /f %windir%\explorer.exe
  • cacls %windir%\explorer.exe /E /G UserName:F (replace UserName with your username in windows 7)
  • taskkill /im explorer.exe /f
  • cd %windir%
  • start unlockProtectedFeatures.exe

Now you need to re launch the shell by clicking the launch button

windows-7-shell

More Win 7 keyboard shortcuts

Window Management

* Win+Left Arrow and Win+Right Arrow: Dock a window to the left or right half of the screen.

* Win+Shift+Left Arrow and Win+Shift+Right Arrow: Move a window from one monitor to another, keeping them in the same relative location to the monitor’s top-left origin.

* Win+Up Arrow and Win+Down Arrow: Maximizes and restores/minimizes a window.

* Win+Shift+Up Arrow and Win+Shift+Down Arrow: Maximizes and restores the vertical size
of a window.

* Win+Home: Minimize all the non-active background windows, keeping the window you’re
using in its current position. (Press Win+Home again to restore the windows to their original locations.)

* Win+(plus key) and Win+(minus key): Zoom in or out using Windows Magnifer.

* Win+E: Opens Windows Explorer.

* Win+U: Opens the Ease of Access Center.

* Win+D: Show/hide the desktop.

* Win+F: Opens the Search Results window.

* Win+L: Locks the computer.

* Win+B: Sets focus to the “Show hidden icons” button on the task bar.

* Win+M: Minimizes all windows.

* Win+Ctrl+F: Opens the Active Directory Find Computers dialog.


Taskbar


* Win+Space: Use “Aero Peek” to see any gadgets or icons you’ve got on your desktop.

* Win+R: Opens the Run dialog.

* Win+T: Move the focus to the first taskbar. (Pressing again will cycle through them.)

* Win+Shift+T: Move the focus to the last taskbar. (Pressing again will cycle through them.)

* Ctrl+(mouse click on a single application icon in the task bar): Toggle through each of the open windows in order. The best example of this is Internet Explorer. If you have five tabs open in a single IE instance, holding the Ctrl key while repeatedly clicking on the single IE icon in the task bar will toggle through each of the five tabs in order.

* Ctrl+Shift+(mouse click on an application icon in the task bar): Launch that application with full administrative rights. You can also use Ctrl+Shift+Enter for commands from the search bar for the same action.

* Shift+(mouse click on an application icon in the task bar): Launch a new instance of the application rather than switching to the existing application. (You can also middle-click with the third mouse button or scroll wheel.)

* Win+1 .. Win+5: Launch a new instance of the any of the first five icons on the task bar. (By the way, the icons can be reordered to suit your needs by simply dragging them around and can be pinned shortcuts or running applications.)

* Shift+(right mouse click on an application icon in the task bar): Show the Window menu. (You get different menus depending on whether the application is running or has multiple instances open.

Protect your data

Protect your data
USB flash drives are convenient, portable, and very easy to lose. Which is a problem, especially if they're carrying sensitive data. Fortunately Windows 7 has the solution: encrypt your documents with an extension of Microsoft's BitLocker technology, and only someone with the password will be able to access it. Right-click your USB flash drive, select Turn on BitLocker and follow the instructions to protect your private files.

Bitlocker

Remove Watermark from Windows 7 beta 1 Desktop

Remove Watermark from Windows 7 beta 1 Desktop

WIndows 7 is in its beta version and you can realize it well with the lapses in the operating system. One such annoying feature with the OS is the water mark embedded in the desktop. To remove the watermark you can follow the steps below. Before beginning with the steps you need to ensure that the User Account Control is disabled.

Step 1: Click on the Start Menu> Control Panel
Step 2: Click on User Accounts. Change User Account Control Settings and adjust the slider so that it is at the bottom of the screen (Never Notify).
Step 3: Next restart the computer
Step 4: After the rebooting browse to the following directory

C:WindowsSystem32en-US
Step 5: Once you’re in the directory locate and right-click the following file
user32.dll.mui
Step 6: From the drop down menu select the properties. Click on the Security tab and click on the Advanced button at the buttom.
Step 7: In the Advanced Security Settings window click on the Owner tab and click Edit.
Step 8: Click OK to effect the changes and return to the original file Properties window.
Step 9: Under the security tab, Click Edit.
Step 10:Select Users and a checkmark to the all the checkboxes giving you full control of the file
Step 11: Rename user32.dll.mui to user32-backup.dll.mui
Step 12: Download the patched version of the files - 32 bit Download or 64 bit Download
Step 13: After the files have been downloaded extract it from the original directory
C:WindowsSystem32en-US
Step 14: Restart the computer

ProgramShortcutKey

Create Keyboard Shortcuts for Programs


You can create keyboard shortcuts for any program in Windows 7.
Right-click the program icon
select Properties.
Select the Shortcut tab, click in Shortcut key, to set the keyboard shortcut for that program.

ProgramShortcutKey

How to Unlock the Windows 7 Hidden Themes


The Windows 7 beta has a pack of hidden and locked themes.Let's see how you can unlock the hidden themes.


Step 1: Open the Explorer (Windows + E) and go to C:\Windows\winsxs
Step 2: Enter *.theme into the search field. Alternately you can use the * sign on the number block.
Step 3: You'll get the Click me prompt
Step 4: Double-click the themes ZA, US, GB, CA, AU to install them.

Make Internet Explorer 8 Load Faster

If you want Internet Explorer 8 to load faster, you need to disable the add-ons that slow it down, so go to Tools -> Manage Add-ons and check the load time for each one. You can choose for yourself the ones you can live without and ones that would increase the load speed.

Use Virtual Hard Disk Files

Use Virtual Hard Disk Files

You can now create and manage virtual hard disks files in Windows 7 as if they were real disks. This can allow you to use a live Windows installation on the virtual disk without the need to boot the virtual Computer. To create a virtual disk you have to press the Windows Key, right-click on Computer, then go to
Manage
-> Disk Management
-> Action
-> Create VHD. There you can specify the location and size of your virtual hard disk file.

To attach the virtual disk file, press the Windows Key, right-click Computer, then go to Manage -> Disk Management -> Action -> Attach VHD and you have to specify the location and if it’s read only or not.

To initialize a virtual hard disk, press the Windows Key, right-click on Computer, go to Manage -> Disk Management -> Action -> Attach VHD, specify the location, click Ok, then right click on the virtual disk and click on Initialize Disk. Select the partition style you want to use and then right-click on the unallocated space and click “New Simple Volume” and follow the instructions wizard. Now, a new hard drive appears in Windows Explorer and you can use it as a real partition.

Extend Windows 7 trail period.


Extend Windows 7 from 30 days to 90 Days trail


Follow the procedure below to extend your trail period

1.Firstly, Download Windows 7 Pre-Beta M3 Build 6801 from here.

2. Burn it on a DVD, and install windows 7.

Note: This hack will work after every days of use, so try these commands 2 times just some days before your 30 days trail is going to end.

3. When installation is complete, open Command Prompt.

Type any of the three commands below:
sysprep /generalize
slmgr.vbs –rearm
rundll32 slc.dll,SLReArmWindows

This is how you can get 90 = 30+60 days of Windows 7 trail period.

Keybord shortcuts

Keyboard shortcuts

Alt+P
Display/ hide the Explorer preview pane

Windows Logo+G
Display gadgets in front of other windows

Windows Logo++ (plus key)
Zoom in, where appropriate

Windows Logo+- (minus key)
Zoom out, where appropriate

Windows Logo+Up
Maximise the current window

Windows Logo+Down
Minimise the current window

Windows Logo+Left
Snap to the left hand side of the screen

Windows Logo+Right
Snap to the right hand side of the screen

Windows Logo+Home
Minimise/ restore everything except the current window

Customise the Windows log-on screen

Customise the log-on screen
Changing the Windows log-on screen used to involve some complicated and potentially dangerous hacks, but not any more - Windows 7 makes it easy.

First, browse to HKEY_LOCAL_MACHINE\Software\Microsoft\Windows\CurrentVersion\Authentication\LogonUI\Background in REGEDIT, double-click the DWORD key called OEMBackground (not there? Create it) and set its value to 1.

Now find a background image you'd like to use. Make sure it's less than 256KB in size, and matches the aspect ratio of your screen as it'll be stretched to fit.

Next, copy that image into the %windir%\system32\oobe\info\backgrounds folder (create the info\backgrounds folders if they don't exist). Rename the image to backgroundDefault.jpg, reboot, and you should now have a custom log-on image.

Alternatively, use a free tweaking tool to handle everything for you. Logon Changer displays a preview so you can see how the log-on screen will look without rebooting, while the Logon Screen Rotator accepts multiple images and will display a different one every time you log on.

Flags

free counters